CS 6610 Advanced Computer Graphics - Project 5
Zach Gildersleeve
December 5, 2006
CADE login: gildersl
Graduate level credit
Source Code
The souce code, both the Xcode files and the Visual Studio files, can be found here (44.48MB .zip) .
Project Objectives
For my final project I intend to explore some of the fundamental concepts of Non-Photorealistic Rendering, or NPR. NPR is a branch of computer graphics research that, by acknowledging that photo-realistic graphics may not be the most ideal means of conveying and presenting all graphic information, frequently draws from artistic styles to explore other means of representation. As many NPR researchers have pointed out, the most relevant details from a representational perspective of any given object are areas of silhouette and creases, and any exploration of NPR techniques must start with the identification of these elements. With the introduction and use of programmable graphics hardware, there has been a movement towards NPR methods that operate without absolute knowledge of geometry. This allows for more general solutions that fit with current graphic research methods, and will be reflected in this project as well.
A silhouette edge is defined as an edge that separates a back facing polygon from a front facing polygon. [4] describes several image space methods to draw a contour on silhouette edges. However, this paper provides no support for creases, and consequentially is not ideal. A crease edge is defined as any edge between adjacent polygons where the angle between the two polygon's normals is greater than an established threshold. [5] describes both silhouette and crease rendering using image processing techniques applied to the depth and normal buffers. The depth map / normal map concept is further described by [2].
Once silhouette and crease edges are drawn, they still must be lit properly. With the standard diffuse lighting model used by OpenGL, silhouette edges in particular tend to undesirably blend in with the diffuse shading. [1] offers a new lighting model for NPR of tone-based shading. A broad range of NPR techniques revolve around using shading and lighting models to achieve different results. A simple example of this is a toon or cell shader, which uses the diffuse normal dot light term to step between multiple solid colors. An extension of this idea is, instead of setting each fragment's color according to a color set by a step function, using a different texture lookup for each step. This is the basic idea of the tonal art maps (TAM) that are introduced in [3] and partially explored in this project.
Project Description
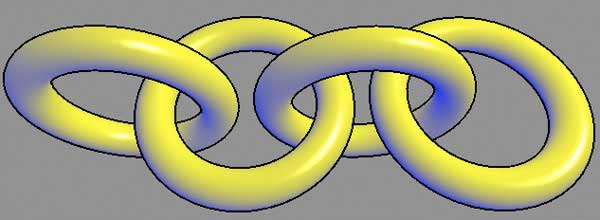
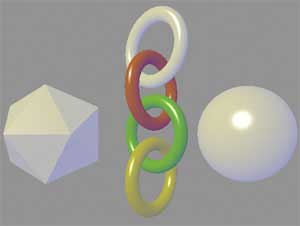
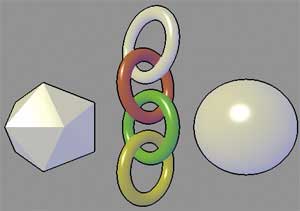
The program demonstrates some of the fundamental concepts of Non-Photorealistic Rendering. As a means for describing these concepts visually, we will start with an basic OpenGL image below:

These objects are lit using the traditional diffuse lighting model, implemented as a GLSL vertex and fragment shader program (diffuseVertex.vert and diffuseFragment.frag) operating per vertex. The color of any vertex is determined by the equation
color.rgb = ambient.material + ambient.global + diffuse.material * color.material * max(0.0, normal dot light)
where normal is the unit surface normal at the vertex, and light is the unit vector of the light at the vertex. This lighting equation will be important later, but first, we will explore the Image Precision method of rendering silhouettes.
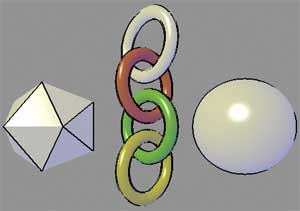
[4] offers the above definition of a silhouette edge, being an edge that separates a back facing polygon from a front facing polygon. Therefore, to draw these silhouette edges in image space, the process is as simple as drawing the back facing polygons only first, unlit and perturbed in some way as to make them larger than normal, and draw the front facing polygons only second with lighting enabled. Several means are described in [4] to perturb the back facing polygons, from simply scaling them larger, translating them closer to the camera a scaled amount, and so on. The program implements two means of generating silhouette edges via this method. The "Translation" button shifts the back facing polygons towards the camera a scaled amount, while the "Line" method reverses the method slightly, and draws the rear facing edges as GL_LINE polygons with a line width greater than one. This two different methods are depicted below.
Translated Silhouettes, thickness = 1.0 |
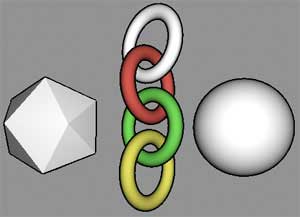 Line Silhouettes, thickness = 1.0 |
Translated Silhouettes, thickness = 5.0 |
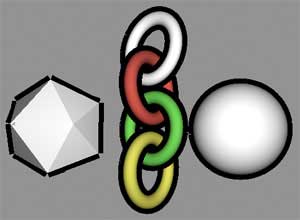 Line Silhouettes, thickness = 5.0 |
Here we can see some of the shortcomings of the method offered by [4] of silhouette rendering. At a silhouette thickness of 1.0, the translated method barely produces noticeable results, and the silhouette edges are not the same thickness across the scene, as would be expected, since the back facing polygons are translated from the origin. The line method does produce clean, consistent results, but this method becomes inconsistent at larger thicknesses. At larger thicknesses, the translated silhouettes start to produce interesting NPR looking images due to their inconsistent nature, but are still far from ideal.
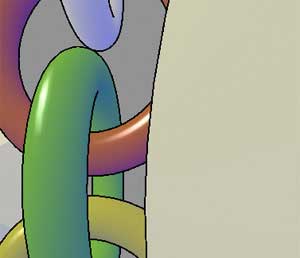
The image produces by the line silhouette method at a thickness of 1.0 hi-lights an additional, more concerning problem with silhouette generation in NPR images. The following image depicts a view across the face of the sphere, looking towards the icosahedron:
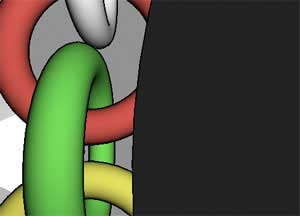
As we can see, the added silhouette edges tend to blend in with the natural diffuse shading attenuation. This could be considered undesirable, given that one of the hallmarks of NPR philosophy is the abstraction and embellishment of components like silhouettes for the purposes of conveying graphical information. It becomes clear that a different lighting model is necessary, as described in [1].
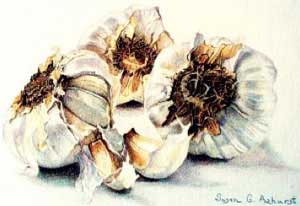
The lighting model in [1] draws inspiration from tone based shading, a fairly standard convention among artists to depict the transition from light to dark as from a warm to cool color rather than simply from white to black. In the above colored pencil drawing by Susan Ashurst, there is a transition in overall tone from yellow to blue, in addition to the color that creates the shape of each garlic bulb. [1] presents a model for simulating this lighting according to the following equations:
color.cool = color.blue + diffuse.material * color.coolLuminance
color.warm = color.yellow + diffuse.material * color.warmLuminance
color.rgb = ((1 + normal dot light) / 2) * color.cool + (1 - ((1 + normal dot light) / 2)) * color.warm
[1] also suggests using a Phong specular component to further signify shape. The image below implements the [1] shading equation, and a per-vertex Blinn/Phong half angle specular component.
 Gooch shading |
 Gooch shading with line silhouettes |
 Silhouette problem resolved |
"A Non-Photorealistic Lighting Model For Automatic Technical Illustration" is the one of the most widely referenced papers on NPR lighting techniques, particularly for anything that is remotely "toonish," and based on the clean results, it is not hard to see why. To give more control over the hue and value (attenuation of material color) of the shading, this functionality is included in the GUI. The topmost image was made using the line silhouettes, and parameters of 1.0 for the blue and yellow hue, and 0.0 for the respective values.
At this point, it is necessary to revisit silhouette rendering, with the goal of adding crease edges to the scene. This is done via the process described in [5] and [2]. A multiple step rendering process is necessary. To extract silhouette edges, we will generate a grayscale depth map; similarly to extract crease edges we will generate a normal map. From these images - stored as textures - a edge detection method will identify sharp changes in the depth map (signifying a silhouette) and sharp changes in the normal map above a set threshold (signifying a crease).
Using a Sobel edge detection filter written in GLSL (edgeVertex.vert and edgeFragment.frag) as suggested in [2] rather than the convolution method offered in "Image Space", the edges of the depth map texture were detected. Using a threshold function, the silhouetted images is returned either as black silhouette, or as the filled interior polygons. This is demonstrated in the image below:
From this image, several shortcomings to this method are apparent. The silhouette edges of the sphere and isohedron are on par with the image space line method, but there are discontinuities in the silhouette edges where the tori overlap. This is due to the similarity of depth of the overlapping tori, compounded by a depth map that is not fully normalized across 0.0 - 1.0.
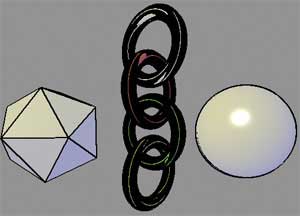
In [5], the normal map is isolated and convoluted using the same texture. In this implementation, the normal is interpolated and stored into a texture using a separate shader (normalVertex.vert and normalFragment.frag) and the normal map texture is passed through the same Sobel edge detection shader. This way, it is possible to compare the depth map and normal map using the same edge detection. It was also noted in [5] that the normal map produced a much noisier, aliased image. This can be seen in the image below:
Most of the object's creases are identified and rendered, however the normal map technique relies more strongly on the threshold level than the depth map. In the current implementation of the edge detection shader, a fragment is declared as a silhouette or edge if any of the three components of the interpolated fragment's color is above the threshold, causing certain points along the silhouette edges to be not identified as normal map creases. A front crease on the isohedron is not identified as well in the above image, but is evident upon moving the camera relative to the object. As the normals are dependent on eye position, this behavior is to be expected. A critical examination of this is evident by adjusting the threshold value. The below image has a threshold value of 0.3, compared to the 1.0 of the image above. It is evident that with the current implementation of this method, using the Sobel edge detection shader with a threshold value, the returned crease edges are dependent on the overall curvature of the object itself. Thus, more creases are to be found on the tori, with a greater curvature, than on the sphere.
Without any further processing, it is not possible to vary the silhouette and crease thickness. An additional rendering step could blur or grown the extracted silhouette line, or feed it back in the normal or depth map texture as a signifier. As this is more an exploration of the specifics of image processing rather than an understanding of the foundation of NPR, this step will not be implemented.
Additional and Future Work
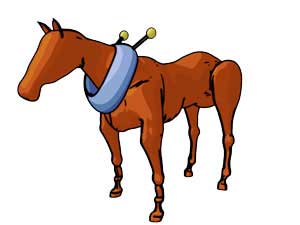
Cell shading, another simple NPR technique, draws from cartoons that operate with a limited color palette. Shading is produced by the banding of color across tonality steps, as seen in the image below, which I did for an animated film using Maya:
An extension of this style of rendering is to replace each color with a different texture. This is the basic idea behind tonal art maps (TAM), a concept offered in [3] using hatched textures. Using the diffuse normal dot light term from a diffuse shading model, different textures are referenced per-vertex based on a step function. This produces a hatched shading style, with a different hatch texture used across each planar polygonal face. Using a six way texture lookup and blending operating per-fragment [3], the different textures are then interpolated (blended) across a face, producing a smoothly hatched model. This is implemented in hardware in a GLSL shader. It is necessary to have texture coordinates for this method, as the object is essentially textured through the shader, so a gluCylinder and gluSphere are generated rather than the glut objects used throughout the project. The four different edge rendering methods can all be applied to these objects, with the line size image precision and hardware silhouettes producing the best results. Due to time constraints, the full paper was not implemented, including the use of mipmapping to store multiple levels of hatch textures. The images below illustrate the current results:
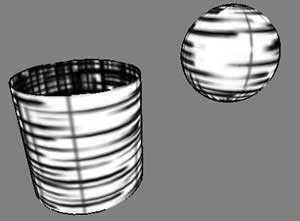 Hatch Shader |
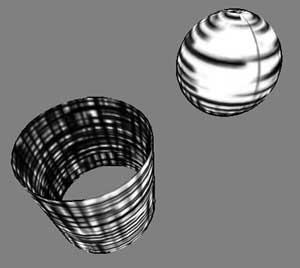 Hatch Shader, rotated to show TAM change |
The diffuse component is broken up across a step function. The resulting hatch weight is stored in two vec3 variables that are then passed to the fragment shader to interpolate across. In the fragment shader, each texture unit is assigned a sampler, and the six possible hatch weights are used to lookup the different textures. The implementation as described in [3] includes comments on how to create textures that can be evenly tiled, as well as how to construct mipmapped texture units that tile evenly across multiple resolutions. Mipmapped textures were not implemented, and consequentially the textures look slightly blurred. The texture coordinates are scaled independently in the vertex shader to produce a visually more appealing image.
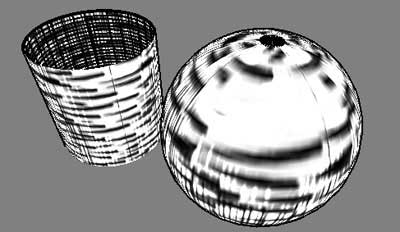
By varying the step function and shifting all the steps downward to make the highest (brightest) step equal to white, it is possible to introduce an implicit white surface, drawn white rather than textured. The following image displays a definite sense of hatching across the surfaces, with an implicit white paper highlight, limited only by the blurriness introduced by not using the full mipmap levels.
Development Platform
This project was coded in C++ and GLSL in Xcode on OS X (10.4.7) using a ATI Mobility Radeon 9700, and ported to MS Visual Studio 2005 on a Windows XP machine. This move was made to fulfill the assignment requirements.
Graphical User Interface

The image to the left illustrates the GUI implemented in GLUI. The radiobuttons under Image Precision Method allow the user to select silhouettes generated either by translation or line size, using the method described in [4]. The thickness of the silhouette edges can be varied using the provided spinner.
When the No Silhouettes radiobutton is selected, it is then possible to engage the hardware silhouette and crease extraction methods. The silhouettes and creases may be drawn separately using the method described in [5]. The threshold used for edge detection may also be varied using the provided spinner.
Under the Light Control panel, different lighting models can be used to fill the polygon objects. The Diffuse Only radiobutton implements the standard OpenGL diffuse lighting model as a per-vertex shader. The NPR Model implements the tone based lighting model described in [1]. Additionally, the blue and yellow temperature and strengths, corresponding roughly to the hue and saturation used, can be adjusted using the provided spinners. The hatch shader can also be selected in this radiobutton group (not shown in image).
Known Bugs and Issues
- The hatching shader is undefined for the translation silhouette method. This is largely due to the use of glu quadric objects rather than glut objects.
References
[1] Amy Gooch, Bruce Gooch, Peter Shirley, and Elaine Cohen. A non-photorealistic lighting model for automatic technical illustration. Computer Graphics 32, Annual Conference Series, 447-452. 1998.
[2] Aaron Hertzmann. Introductio to 3D Non-Photorealistic Rendering: Silhouettes and Outlines. Media Research Laboratory, Department of Computer Science, New York University. http://www.mrl.nyu.edu/hertzmann/
[3] Emil Praun, Hugues Hoppe, Matthew Webb, and Adam Finkelstein. Real-Time Hatching. In Proceedings of ACM SIGGRAPH 2001, Computer Graphics Proceedings, Annual Conference Series, 579–584. 2001.
[4] Ramesh Raskar and Michael Cohen. Image Precision Silhouette Edges. In Proc. 1999 ACM Symposium on Interactive 3D Graphics, April 1999.
[5] Jiening Wang, Jizhou Sun, Ming Che, Qi Zhai and Weifang Nie. Image Space Silhouette Extraction Using Graphics Hardware. Lecture Notes in Computer Science. Computational Science and Its Applications - ICCSA 2005.