CS 6360 Virtual Reality- Assignment 5
Zach Gildersleeve
April 4, 2007
Augmented Reality with ARToolKit
This project explores augmented reality (AR) with ARToolKit. Using tracking markers included with ARToolKit, as well as supplemental patterns supplied by PatternMaker, an augmented reality architectural walk-though was designed and built. Using several rooms in my house as the location, markers were placed over each door. These markers were registered to the real door frame, and each placed an augmented reality door frame over each door. Other markers were placed at eye/camera level throughout the rooms used in this project, attempting to allow free camera movement within the space and still maintain at least one registered AR element within the frame at all times. This was not always possible, as shall be discussed below. The door and wall marker objects also maintain GLUT outline text elements, which in AR labels each door, as well as floating text that points to particular rooms or elements within each room. Finally, in case I got hungry, the fridge and stove are marked and labeled. The stove and fridge labels are also tied into other labels, so it is possible to find the fridge from a room where the real fridge is not visible.
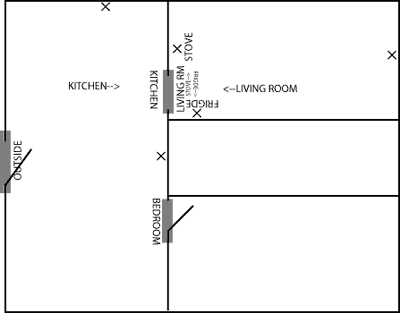
For illustrative purposes, below is a rough representation of my house, with the marked doors, additional wall markers, and an idea of the floating text labels. Text with arrows (-->) point to the object they label, and text without arrows are directly in or above the object they label.
While a fair amount of my house was marked, not all of the marker placements were as successful as others. The house in question is a small bungalow, which architecturally is not a style known for being uniformly and brightly lit. Marker placement was limited by the brighter parts of the house, and what could be reinforced with additional lighting. Much of the images below are taken from the area between the kitchen and the living room.
It was also determined that the more markers used - here using markers from PatternMaker - the more chance that any two random markers might look like each other under certain lighting conditions and certain camera angles, or might match preexisting artwork or architectural elements. As I understand the purpose of PatternMaker is to make n markers such that each marker is as as different from the others as possible, but with the preexisting marker provided this is not necessarily possible.
Implemented AR Scene
The implemented code for this AR environment is built using the ARToolKit, and code from several of the provided examples in the kit. Specifically, multiple markers are loaded by first including information about all the markers in object_assignment. This file lists the nine most successful markers, the pattern file that describes each marker, and size and origin of each marker. Markers of two sizes were used, a medium size of 102.0 cm, and a large size of 210.0cm. During run time, the medium markers actually out preformed the large markers in terms of quick identification and tracking stability, - this is largely due to the specific location of the markers in the room, and that larger markers means more frame space is required to identify the marker - and the markers in PatternMaker out preformed the hiro and kanji patterns supplied with ARToolKit.
The list of markers object_assignment is loaded into assignment.c, and this list is then used during the mainLoop() function to identify markers and place the objects associated with each marker. Averaging using the history of each marker is enabled using arDetectMarker() and arGetTransMatCont(). Using this history functionality made a big improvement when tracking a single pattern in the frame, but each additional marker in the frame increased jitter and decreased detection time. The function draw_object() draws each object, depending on the identified marker name. Additional switching throughout assignment.c attempts to maintain certain text labels in the frame at all time, regardless of the marker set identified. An example of this is the floating text pointer KITCHEN-->. This text is displayed from several markers, and roughly positioned in the same location in the room. The switching functionality draws this text, but if two similar markers are both visible and tracked at one time, only one text object is drawn to avoid too much text cluttering the screen. How successful this particular functionality was during run time depended on the correctness and exactness of the identified markers, which was not always ideal.
Results
The below images are captured during an exploration of the AR space between the kitchen and the living room. Several videos are included as well. To enable both the AR environment and video capture running at the same time, the videos were captured at 10 frames per second, which still slowed performance of the AR application. When running the application without video capture, the AR environment operated at a much smoother frame rate.
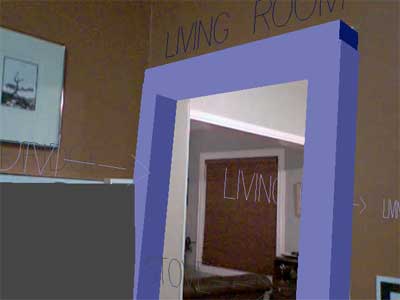
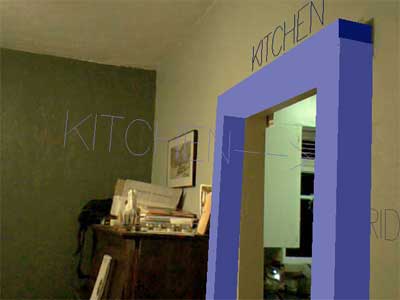
The below two images are looking from the kitchen into the living room. The door frame is correctly identified and registered, as is the fridge. The stove (lower right) is identified, but the stove cube and label are out of the frame. The text that passes through the door identify the path out of the kitchen (LIVING ROOM-->), and a second floating text element points to the stove from the fridge. Notice that the door frame seems to tilt out in the first image, and tilt in in the second. From the camera perspective and at a distance, it is difficult to identify the exact rotation of the marker. Closer to the marker, the door frame matches the real door frame, without any swinging.

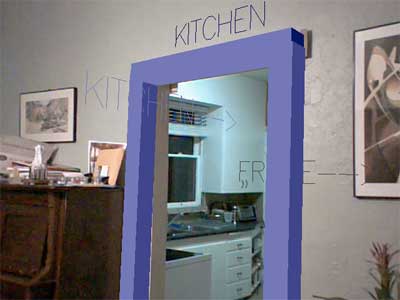
The next two images show that same doorway, looking back into the kitchen. Now the text through the door indicate the path out of the living room into the kitchen (KITCHEN-->). The fridge is also identified, even though the real fridge and its marker are not visible. The lighting in this room is slightly more uniform, which helped this door frame stay in position compared to the previous images.
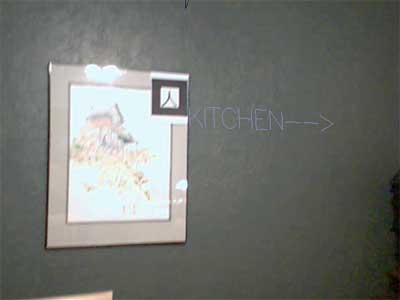
The final image is one of the wall markers, that again identifies the direction to the kitchen.
This video illustrates moving into the kitchen to find the fridge correctly identified. The speed of the fridge marker identification is roughly equivalent to the duration during run time without video capture.
The second video is taken in the same area, and highlights several of the wall markers.
Discussion
The space used for the project was fairly small and well known, but the process could easily be applied to a larger space for a first time visitor. Identifying the direction into the kitchen is obvious by looking into the kitchen; a more technical arena such as a factory or industrial compound would benefit directly by non-obvious and technically demanding objects and locations pointed out to the lay person. This is the essence of applied augmented reality when applied to large areas for navigation.
This project reveals several of the key steps that need to be refined for a fully functional AR environment. Lighting, or at least lighting for the markers, needs to be uniform and correct. I found it beneficial to place all the wall makers at eye/camera level, which allowed for quick identification of markers while sweeping the room with the camera, but looking at the floor, or closer to an object typically lost the markers completely. Thus, for a marker based AR, further scalable markers are required. Finally, more detailed geometric models are required, and each doorframe would have benefited from additional markers. For this to work, multiple markers would have to be placed, and the distance between markers measured in sub centimeter precision in three dimensions, and each point registered to the door frame model with the same precision.
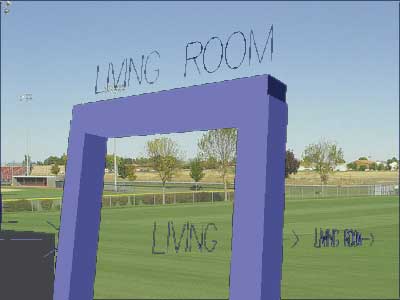
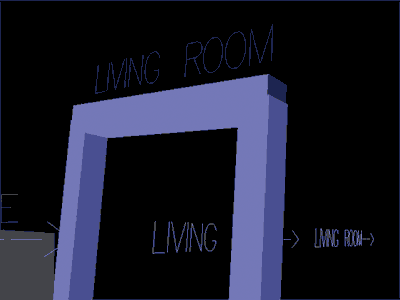
If all these steps are done, the user could expect a more constant AR experience, but may be difficult for complex environments. For identification of real world items and locations, such exact registration is necessary. One final thought: if the video component of the AR display - the real world - is removed from the rendering process, the result is what I would consider an easier environment to engage with. The below image illustrates this, and is somewhere between augmented reality and virtual reality; no real elements are displayed, but navigating around this environment solely using the image forces me to still walk through the door frame, otherwise I run into a wall.
For my final project, I intend to explore this distinction, incorporating augment reality and virtual reality to create a new environment.